Fichier:Enigma wiring kleur.svg
Aller à la navigation
Aller à la recherche

Taille de cet aperçu PNG pour ce fichier SVG : 424 × 599 pixels. Autres résolutions : 170 × 240 pixels | 340 × 480 pixels | 544 × 768 pixels | 725 × 1 024 pixels | 1 450 × 2 048 pixels | 708 × 1 000 pixels.
Fichier d’origine (Fichier SVG, nominalement de 708 × 1 000 pixels, taille : 48 kio)
Conditions d’utilisation
| Description |
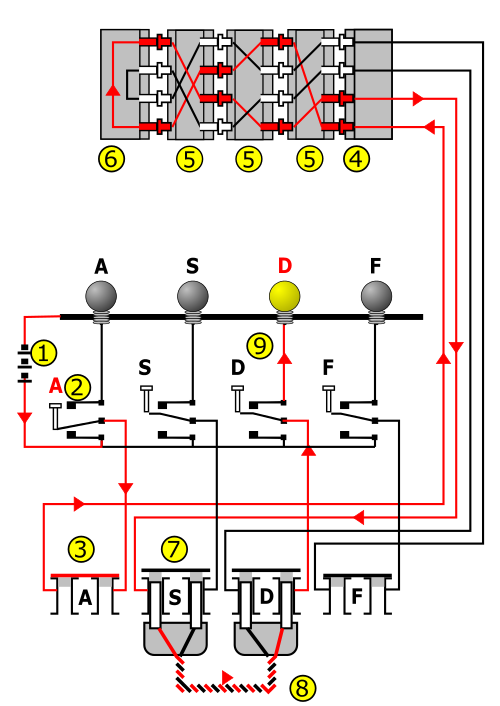
العربية: مسار التيار في أجزاء آلة إنجما مرقومًا من (1) إلى (9): يسري التيار من المدخرة (1) عبر مقلاد ثنائي الاتجاه مضغوط في لوحة المفاتيح (2) إلى لوحة المقابس (3)، وفيها يمر عبر المقبس A غير المُستعمل في هذا المثال، والذي يظهر مغلقًا، ثم يمر إلى عجلة الإدخال (4) ثم يعبر الأسلاك في الدوارات المُضافة(5)، وعددها 3 في التنويعة التي استعمتلها القوات المسلحة النازية و4 في التنويعة التي استعملتها القوات البحرية النازية، ثم إلى العاكِس (6) الذي يُعيد التيار في إلى الدوَّرات ولكن ليعبرها بمسار مغاير للمسار السابق (5)، ثم إلى عجلة الإدخال (4)، ثُمَّ إلى المقبس S، الموصول بكبل إلى المقبس D، الرقمان (7) و(8) في الشكل، ثُمَّ إلى مقلاد ثانٍ ثنائي الاتجاه (9) وأخيرًا إلى مصباح مرتبط بالحرف الناتج، D في هذه الحالة.
English: To explain the Enigma, we use this wiring diagram. To simplify the example, only four components of each are shown. In reality, there are 26 lamps, keys, plugs and wirings inside the rotors. The current flows from the battery (1) through the depressed bi-directional letter-switch (2) to the plugboard (3). The plugboard allows rewiring the connections between keyboard (2) and fixed entry wheel (4). Next, the current proceeds through the—unused, so closed—plug (3) via the entry wheel (4) through the wirings of the three (Wehrmacht Enigma) or four (Kriegsmarine M4 or Abwehr variant) rotors (5) and enters the reflector (6). The reflector returns the current, via a different path, back through the rotors (5) and entry wheel (4), and proceeds through plug 'S' connected with a cable (8) to plug 'D', and another bi-directional switch (9) to light-up the lamp.
Copied from Wikipedia:Enigma machine |
||||||||
| Date | |||||||||
| Source |
Travail personnel |
||||||||
| Auteur | MesserWoland | ||||||||
| Autorisation (Réutilisation de ce fichier) |
MesserWoland, en tant que détenteur des droits d’auteur sur cette œuvre, la publie sous les licences suivantes :
Ce fichier est disponible selon les termes de la licence Creative Commons Attribution – Partage dans les Mêmes Conditions 2.5 Générique Attribution:
Vous pouvez choisir l’une de ces licences. |
||||||||
| Autres versions | Œuvres dérivées de ce fichier : Enigma wiring kleur.jpg | ||||||||
| SVG information |

Historique du fichier
Cliquer sur une date et heure pour voir le fichier tel qu'il était à ce moment-là.
| Date et heure | Vignette | Dimensions | Utilisateur | Commentaire | |
|---|---|---|---|---|---|
| actuel | 7 mars 2015 à 09:54 | | 708 × 1 000 (48 kio) | wikimediacommons>Matthias M. | text to path |
Utilisation du fichier
Les 2 pages suivantes utilisent ce fichier :